Sunday 29 January 2017

Dayvani's Vanity Table

My little one is turning 7 in a month and she has out grown her plastic vanity table.  She loves sitting at mine and getting herself ready for school in the morning.  I decided to make one for her for her birthday.
I purchased a sewing table from Good Will for $40 and will make it into a vanity table for her room.  It was the perfect width for the space it needs to go in.

First thing I needed to do was take it apart.....


Taking the top off was easy as it was simply screwed into place.  Then I used a small reciprocating saw to take the front face off of it.

I sanded the entire vanity and all of the shelf pieces before I built the shelf.  I then used the top of the table to make a vanity shelf and a top for the right side of the vanity where the drawers were.  I then filled some of the holes that were left from dismantling it.  The filler needed to dry overnight.

I have done two coats of white paint on the base of the vanity and colors on the drawers.  I am letting the paint set for at least 48 hours. 
I plan to purchase fun handles for the drawers and place a coat of clear varnish on the base of the vanity top.  A mirror will be purchased to hang behind it.  I will post the final product later.


Monday 28 March 2016

Bathroom Redo

My bathroom was very outdated and had a VERY small bathtub.  Being a person who likes her soaks in the bath tub I needed to freshen up my bathroom.  I took exhaustive measurements of my bathroom and ordered all of my supplies ahead of time and had them delivered to my house.  Luckily I had room to store my supplies in my garage while I did demo.


The bathroom was very bad and required removal of a lot of plaster and old tile and moldy tub surround.  WEAR a MASK!!!!


I needed to remove all of the old insulation as well.  Once all of the walls were removed and the tub was torn out I was able to update the plumbing to new PVC.  I didn't have to do the toilet as it was done when my basement was updated.  The sink and tub plumbing was easy to change out once everything was torn out.


Once the plumbing was hooked up I made sure I ran the water to ensure there wasn't any leaks!  Tip:  Make sure the drain of your tub in on the correct side before you drag it into your bathroom!
I ensured that I bought the drywall for bathrooms to put in and around the tub area.


Once the drywall was finished I installed a tub surround.  I also began assembling the furniture for the bathroom.


The finished product is as close to my dream bathroom as I will get in my old house!  I love it!  I bought all of my furnishing and tub and toilet and such from Lowes.


Backyard Redo

A few years back I decided it was time to make my backyard functional for my family.  I needed more open space for my daughter to run around and better flow.  Flower beds needed to be moved, the yard needed to be graded and patios needed to be created.  It was a lot of work but now that the flowers are growing in and the grass has taken route it was worth it.
First step was to remove the old grass and weeds!  I also removed the patio blocks where the fire pit sat.  I treated underneath the patio blocks for red ants!


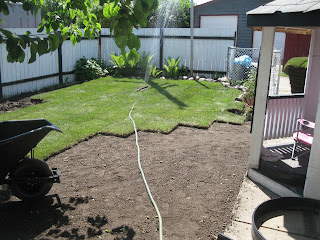
Once the grass had died I rented a sod lifter and pulled it up in strips.  I then rolled up all of the dead grass and hauled it to the waste facility.  This was a dirty job!  The sod lifter was super easy to operate and cheap to rent from Home Depot.


Once I had a majority of the dead grass removed I began grading the back yard.  Before I began laying down the fresh top soil I measured out where I wanted my two patios along the fence as well as my three flower beds.  I framed one of the flower beds out as I was grading the back yard.


Once the yard was graded I layed the sod down and then went away on vacation for a week.  I set the sprinklers to water the lawn a LOT while I was gone and gave it a chance to take hold before anyone walked or played on it.


Upon returning from vacation I began working on the two small patios.  The back one didn't take much digging down since the back portion of the yard needed to be raised so much.  I had enough room for the gravel and the bricks.  The front one needed some digging down.

To tamp down the gravel in the patio I rented this tamper from Home Depot.  Fairly easy to use but VERY heavy.  Once the patios were measured and frames the pattern of the bricks was figured out.

In hindsight I would have layed the frames of the patios under the grass to prevent the slight lip at the edge.  But overall it worked very well.  I also framed out the flower beds with black edging and bricks.  I used some of the extra top soil to build up the flower beds.  I added some peat moss to the soil to make it better for perennial flowers.

Upon completion of the laying the patio bricks there was filling sand brushed in between the spaces.  In the bottom picture the grass took quite a beating from us walking on it while building the patios.  It bounced back nicely the next summer.  The sanding in between the bricks also needs to be done every summer as it settles in.

The last two photos are from the following summer.  The grass has taken nicely and the patios have stayed nice and sturdy.